

Experiment Class of Fed-BioMed
Introduction
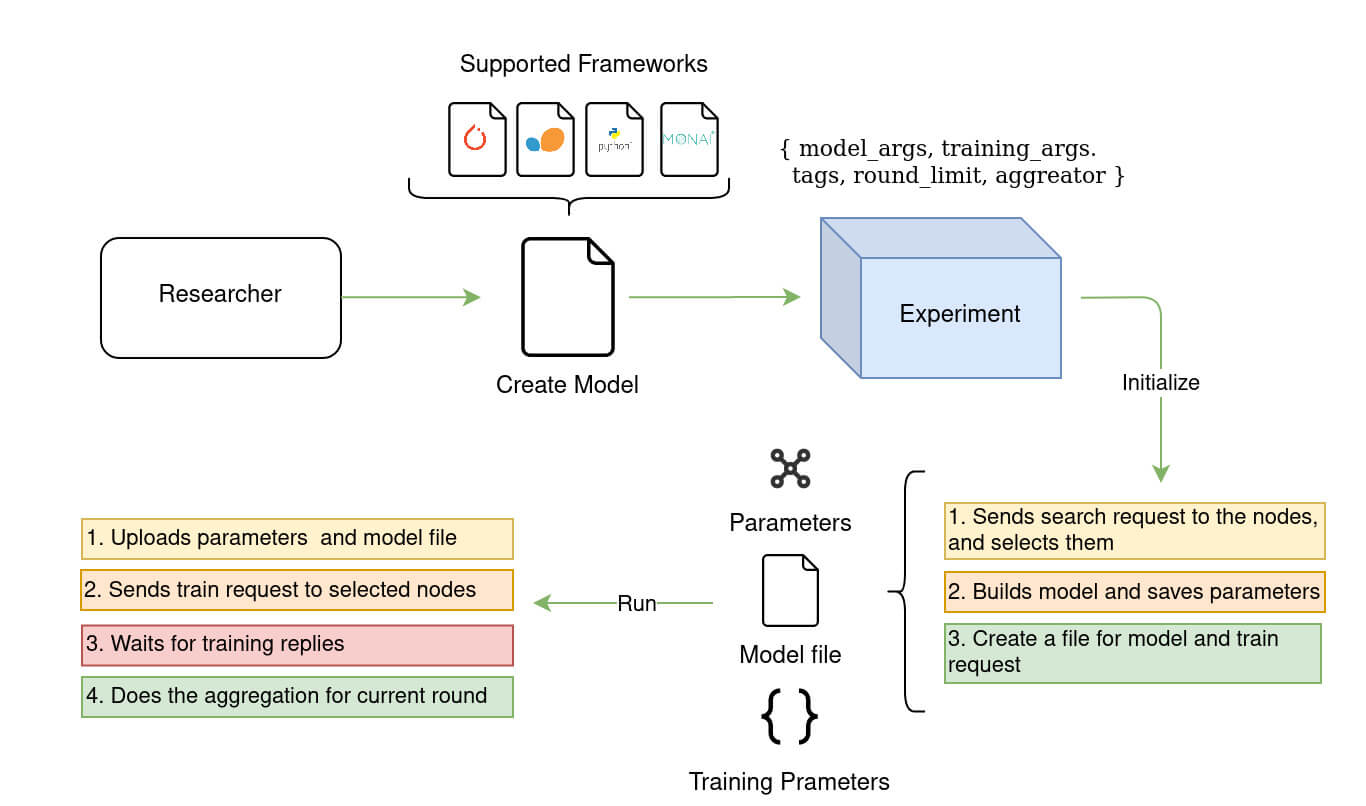
Fed-BioMed provides a way to perform Federated Learning, that is a model training process over multiple nodes where the datasets are stored and models get trained. The experiment is in charge of orchestrating the training process on available nodes. Orchestrating means;
- Searching the datasets on active nodes, based on specific tags given by a researcher and used by the nodes to identify the dataset.
- Uploading the training plan file created by the researcher and sending the file URL to the nodes.
- Sending model and training arguments to the nodes.
- Tracking training process in the nodes during all training rounds.
- Checking the nodes responses to make sure that each round is successfully completed in every node.
- Downloading the local model parameters after every round of training.
- Aggregating the local model parameters based on the specified federated approach, and eventually sending the aggregated parameters to the selected nodes for the next round.
Please see the following Figure 1 to understand what experiment does after its declaration.
Defining an experiment
The code snippet below shows a basic experiment initialization for federated training. These arguments have to be passed to the experiment to tune the experiment based on user preferences.
exp = Experiment(tags=tags,
                 nodes=None,
                 training_plan_class=Net,
                 training_args=training_args,
                 round_limit=rounds,
                 aggregator=FedAverage(),
                 node_selection_strategy=None)
It is also possible to define an empty experiment and set the arguments afterwards, using the setters of the experiment object. Please visit the tutorial "In depth experiment configuration" to find out more about declaring an experiment step by step
When you first initialize your experiment by providing all the arguments as it is shown in the code snippet above, it creates a FederatedDataSet by searching the datasets in nodes based on the given list of tags. Afterwards, it initializes a Job object with training_plan_class, training_arguments, model_args, and the training plan code to manage federated training rounds on all participating nodes. However, it also creates the strategy to select the nodes for each training round. When the node_selection_strategy is set to None, the experiment uses the default strategy which is DefaultStrategy.
Looking for a specific dataset using Tags
Nodes can deploy multiple datasets. It means that on each node, each dataset should have a unique dataset id. Since the dataset ids might change from one node to another, there should be another identifier which will be global for the datasets which are deployed for a specific training plan. This identifier is called "Tags". Tags allow researchers to select the same dataset registered under a given tag (or list of tags) on each node for the training.
The argument tags of the experiment is used for dataset search request. It can be a list of tags which are of type string or single tag as of type string. It can be declared at the first definition of experiment or using the setter of the experiment, as illustrated in the code snippet below: in this example, each stanza can be used to retrieve default dataset (tagged using #MNIST and #dataset).
exp = Experiment()
exp.set_tags(tags=['#MNIST', '#dataset'])
#or
exp.set_tags(tags='#MNIST')
You can check your tags in your experiment as follows:
tags = exp.tags()
print(tags)
# > OUTPUT:
# > ['#MNIST', '#dataset']
An Experiment object must have one unique dataset per node. Object creation fails if this is not the case when trying to instantiate the FederatedDataSet object. This is done to ensure that training for an Experiment uses only a single dataset for each node.
As a consequence, tags specified for an Experiment should not be ambiguous, which means they cannot match multiple datasets on one node.
For example if you instantiate Experiment(tags='#dataset') and a node has registered one dataset with tags ['#dataset', '#MNIST'] and another dataset with tags ['#dataset', '#foo'] then experiment creation fails.
Selecting specific Nodes for the training
The argument nodes stands for filtering the nodes that are going to be used for federated training. It is useful when there are too many nodes on the network, and you want to perform federated training on specific ones. nodes argument is a list that contains node ids. When it is set, the experiment queries only the nodes that are in the list for a dataset matching tags. You can visit listing datasets and selecting nodes documentation to get more information about this feature.
nodes = ['node-id-1', 'node-id-2']
exp.set_nodes(nodes=nodes)
nodes argument is None which means that each node that a has registered dataset matching all the tags will be part of the federated training. exp.set_nodes(nodes=None)
Setting nodes doesn't mean sending another dataset search request to the nodes. If the training data has been already set for the experiment, you need to run exp.set_training_data(training_data=None, from_tags=True) to update FederatedDataset after changing the nodes. This command will send search request to specified nodes (to all if nodes is None) and update training data (FederatedDataset)
Load your Training Plan: Training Plan Class and Training Plan Path
The training_plan_class is the class where the model, training data and training step are defined. Although not required, optimizers and dependencies can also be defined in this class. The experiment will extract source of your training plan, save as a python module (script), and upload to the file repository during every round of training. Thanks to that, each node can construct the model and perform the training.
class MyTrainingPlan(TorchTrainingPlan):
    def init_model(self, model_args):
        # Builds the model and returns it
        return model

    def init_optimizer(self, optimizer_args):
        # Builds the optimizer and returns it
        return optimizer

    def training_step(self):
        # Training step at each iteration of training
        return loss

    def training_data(self):
        # Loads the dat and returns Fed-BioMed DataManager
        return DataManager()

exp.set_training_plan_class(training_plan_class=MyTrainingPlan)

# Retrieving training plan class from experiment object
training_plan_class = exp.training_plan_class()
There is also another optional argument called training_plan_path. This argument can be used when the training plan class is not created in current python workspace but in a different python script. In such scenarios, training_plan_path should indicate the path where your python script is saved, and the argument training_plan_class should be the name of the class that defined in the python script.
exp.set_training_plan_path(training_plan_path='path/to/your/python/training-plan/script.py')
# Let's assume that class name in `script.py` is `Net` as: `class Net:`
exp.set_training_plan_class(training_plan_class='Net')
Model Arguments
The model_args is a dictionary with the arguments related to the model (e.g. number of layers, layer arguments and dimensions, etc.). This will be passed to the init_model method during model setup. For example, the number of features that are going to be used in network layers can be passed with model_args. An example is shown below.
{
    "in_features"   : 15
    "out_features"  : 1
}
These parameters can then be used within a TrainingPlan as in the example below,
class MyTrainingPlan(TorchTrainingPlan):

    def init_model(self, model_args):
        model = self.Net(model_args)
        return model

    class Net(nn.Module):
        def __init__(self, model_args):
            super().__init__()
            self.in_features = model_args['in_features']
            self.out_features = model_args['out_features']
            self.fc1 = nn.Linear(self.in_features, 5)
            self.fc2 = nn.Linear(5, self.out_features)
Special model arguments for scikit-learn experiments
In scikit-learn experiments, you are required to provide additional special arguments in the model_args dictionary. For classification tasks, you must provide both a n_features and an n_classes field, while for regression tasks you are only required to provide a n_features field.
n_features: an integer indicating the number of input features for your modeln_classes: an integer indicating the number of classes in your task
Note that, as an additional requirement for classification tasks, classes must be identified by integers in the range 0..n_classes
Training Arguments
training_args is a dictionary, containing the arguments for the training on the node side (e.g. batch size, optimizer_args, epochs, etc.). These arguments are dynamic, in the sense that you may change them between two rounds of the same experiment, and the updated changes will be taken into account (provided you also update the experiment using the set_training_args method).
Always specify batch size
Although not a strict requirement, it is good practice to always specify batch_size in your training arguments
To set the training arguments you may either pass them to the Experiment constructor, or set them on an instance with the set_training_arguments method:
exp.set_training_arguments(training_args=training_args)
exp.training_args()
Controlling the number of training loop iterations
The preferred way is to set the num_updates training argument. This argument is equal to the number of iterations to be performed in the training loop. In mini-batch based scenarios, this corresponds to the number of updates to the model parameters, hence the name. In PyTorch notation, this is equivalent to the number of calls to optimizer.step.
Another way to determine the number of training loop iterations is to set epochs in the training arguments. In this case, you may optionally set a batch_maxnum argument, in order to exit the training loop before a full epoch is completed. If batch_maxnum is set and is greater than 0, then only batch_maxnum iterations will be performed per epoch.
num_updates is the same for all nodes
If you specify num_updates in your training_args, then every node will perform the same number of updates. Conversely, if you specify epochs, then each node may perform a different number of iterations if their local dataset sizes differ.
Note that if you set both num_updates and epochs by mistake, the value of num_updates takes precedence, and epochs will effectively be ignored.
Why num updates?
In a federated scenario, different nodes may have datasets with very different sizes. By performing the same number of epochs on each node, we would be biasing the global model towards the larger nodes, because we would be performing more gradient updates based on their data. Instead, we fix the number of gradient updates regardless of the dataset size with the num_updates parameter.
Compatibility
Not all configurations are compatible with all types of aggregators and experiments. We list here the known constraints:
- the Scaffold aggregator requires using
num_updates
Sub-arguments for optimizer and differential privacy
In Pytorch experiments, you may include sub arguments such as optimizer_args and dp_args. Optimizer arguments represents the arguments that are going to be passed to def init_optimizer(self, o_args) method as dictionary and (dp_args) represents the arguments of differential privacy.
Optimizer arguments and differential privacy arguments are valid only in PyTorch base training plan.
training_args = {
    'batch_size': 20,
    'num_updates': 100,
    'optimizer_args': {
        'lr': 1e-3,
    },
    'dp_args': {
        'type': 'local',
        'sigma': 0.4,
        'clip': 0.005
    },
    'dry_run': False,
}
Aggregator
An aggregator is one of the required arguments for the experiment. It is used on the researcher for aggregating model parameters that are received from the nodes after every round. By default, when the experiment is initialized without passing any aggregator, it will automatically use the default FedAverage aggregator class. However, it is also possible to set a different aggregation algorithm with the method set_aggregator. Currently, Fed-BioMed has only FedAverage class, but it is possible to create a custom aggregator class. You can see the current aggregator by running exp.aggregator(). It will return the aggregator object that will be used for aggregation.
When you pass the aggregator argument as None it will use FedAverage aggregator (performing a Federated Averaging aggregation) by default.
exp.set_aggregator(aggregator=None)
or you can directly pass an aggregator class
from fedbiomed.researcher.aggregators.fedavg import FedAverage
exp.set_aggregator(aggregator=FedAverage)
Custom aggregator classes should inherit from the base class Aggregator of Fed-BioMed. Please visit user guide for aggregators for more information.
Node Selection Strategy
Node selection Strategy is also one of the required arguments for the experiment. It is used for selecting nodes before each round of training. Since the strategy will be used for selecting nodes, thus, training data should be already set before setting any strategies. Then, strategy will be able to select among training nodes that are currently available regarding their dataset.
By default, set_strategy(node_selection_strategy=None) will use the default DefaultStrategy strategy. It is the default strategy in Fed-BioMed that selects for the training all the nodes available regardless their datasets. However, it is also possible to set different strategies. Currently, Fed-BioMed only provides DefaultStrategy but you can create your custom strategy classes.
Round Limit
The experiment should have a round limit that specifies the max number of training round. By default, it is None, and it needs to be created either declaring/building experiment class or using setter method for round limit. Setting round limit doesn't mean that it is going to be permanent. It can be changed after running the experiment once or more.
exp.set_round_limit(round_limit=4)
To see current round limit of the experiment:
exp.round_limit()
You might also wonder how many rounds have been completed in the experiment. The method round_current() will return the last round that has been completed.
exp.round_currrent()
Displaying training loss values through Tensorboard
The argument tensorboard is of type boolean, and it is used for activating tensorboard during the training. When it is True the loss values received from each node will be written into tensorboard event files in order to display training loss function on the tensorboard interface.
Tensorboard events are controlled by the class called Monitor. To enable tensorboard after the experiment has already been initialized, you can use the method set_monitor() of the experiment object.
exp.set_monitor(tensorboard=True)
You can visit tensorboard documentation page to get more information about how to use tensorboard with Fed-BioMed
Saving Breakpoints
Breakpoint is a researcher side function that saves an intermediate status and training results of an experiment to disk files. The argument save_breakpoints is of type boolean, and it indicates whether breakpoints of the experiment should be saved after each round of training or not. save_breakpoints can be declared while creating the experiment or after using its setter method.
exp.set_save_breakpoints(sTrue)
Setting save_breakpoints to True after the experiment has performed several rounds of training will only save the breakpoints for remaining rounds.
Please visit the tutorial "Breakpoints (experiment saving facility)" to find out more about breakpoints.
Experimentation Folder
Experimentation folder indicates the name of the folder in which all the experiment results will be stored/saved. By default, it will be Experiment_XXXX, and XXXX part stands for the auto increment (hence, first folder will be named Experiment_0001, the second one Experiment_0002 and so on). However, you can also define your custom experimentation folder name.
Passing experimentation folder while creating the experiment;
exp = Experiment(
    #....
    experimentation_folder='MyExperiment'
    #...
)
Setting experimentation folder using setter;
exp.set_experimentation_folder(experimentation_folder='MyExperiment')
Using custom folder name for your experimentation might be useful for identifying different types of experiment. Experiment folders will be located at ${FEDBIOMED_DIR}/var/experiments. However, you can always get exact path to your experiment folder using the getter method experimentation_path(). Below is presented a way to retrieve all the files from the folder using os builtin package.
import os

exp_path = exp.experimentation_path()
os.listdir(exp_path)
Running an Experiment
train_request and train_reply messages
Running an experiment means starting the training process by sending train request to nodes. It publishes training commands as JSON string on the MQTT topics (separate topics for each node) that are subscribed by each live node. After sending training commands it waits for the responses that will be sent by the nodes. The following code snippet represents an example of train request.
{
  "researcher_id": "researcher id that sends training command",
  "job_id": "created job id by experiment",
  "training_args": {
    "batch_size": 32,
    "optimizer_args": {
      "lr": 0.001
    },
    "epochs": 1,
    "dry_run": false,
    "batch_maxnum": 100
  },
  "model_args": <args>,
  "command": "train",
  "training_plan_url": "<training plan url>",
  "params_url": "<model_parameter_url>",
  "training_plan_class": "Net",
  "training_data": {
    "node_id": [
      "dataset_id"
    ]
  }
}
After sending train requests, Experiment waits for the replies that are going to be published by each node once every round of training is completed. These replies are called training replies, and they include information about the training and the URL from which to download model parameters that have been uploaded by the nodes to the file repository. The following code snippet shows an example of training_reply from a node.
{
   "researcher_id":"researcher id that sends the training command",
   "job_id":"job id that creates training job",
   "success":True,
   "node_id":"ID of the node that completes the training ",
   "dataset_id":"dataset_dcf88a68-7f66-4b60-9b65-db09c6d970ee",
   "params_url":"URL of the model parameters' file obtained after training",
   "timing":{
      "rtime_training":87.74385611899197,
      "ptime_training":330.388954968
   },
   "msg":"",
   "command":"train"
}
training_reply always results of a training_request sent by the Researcher to the Node. To complete one round of training, the experiment waits until receiving each reply from nodes. At the end of the round, it downloads the model parameters that are indicated in the training replies. It aggregates the model parameters based on a given aggregation class/algorithm. This process is repeated until every round is completed. Please see Figure 1 to understand how federated training is performed between the nodes and the researcher (Experiment) component.
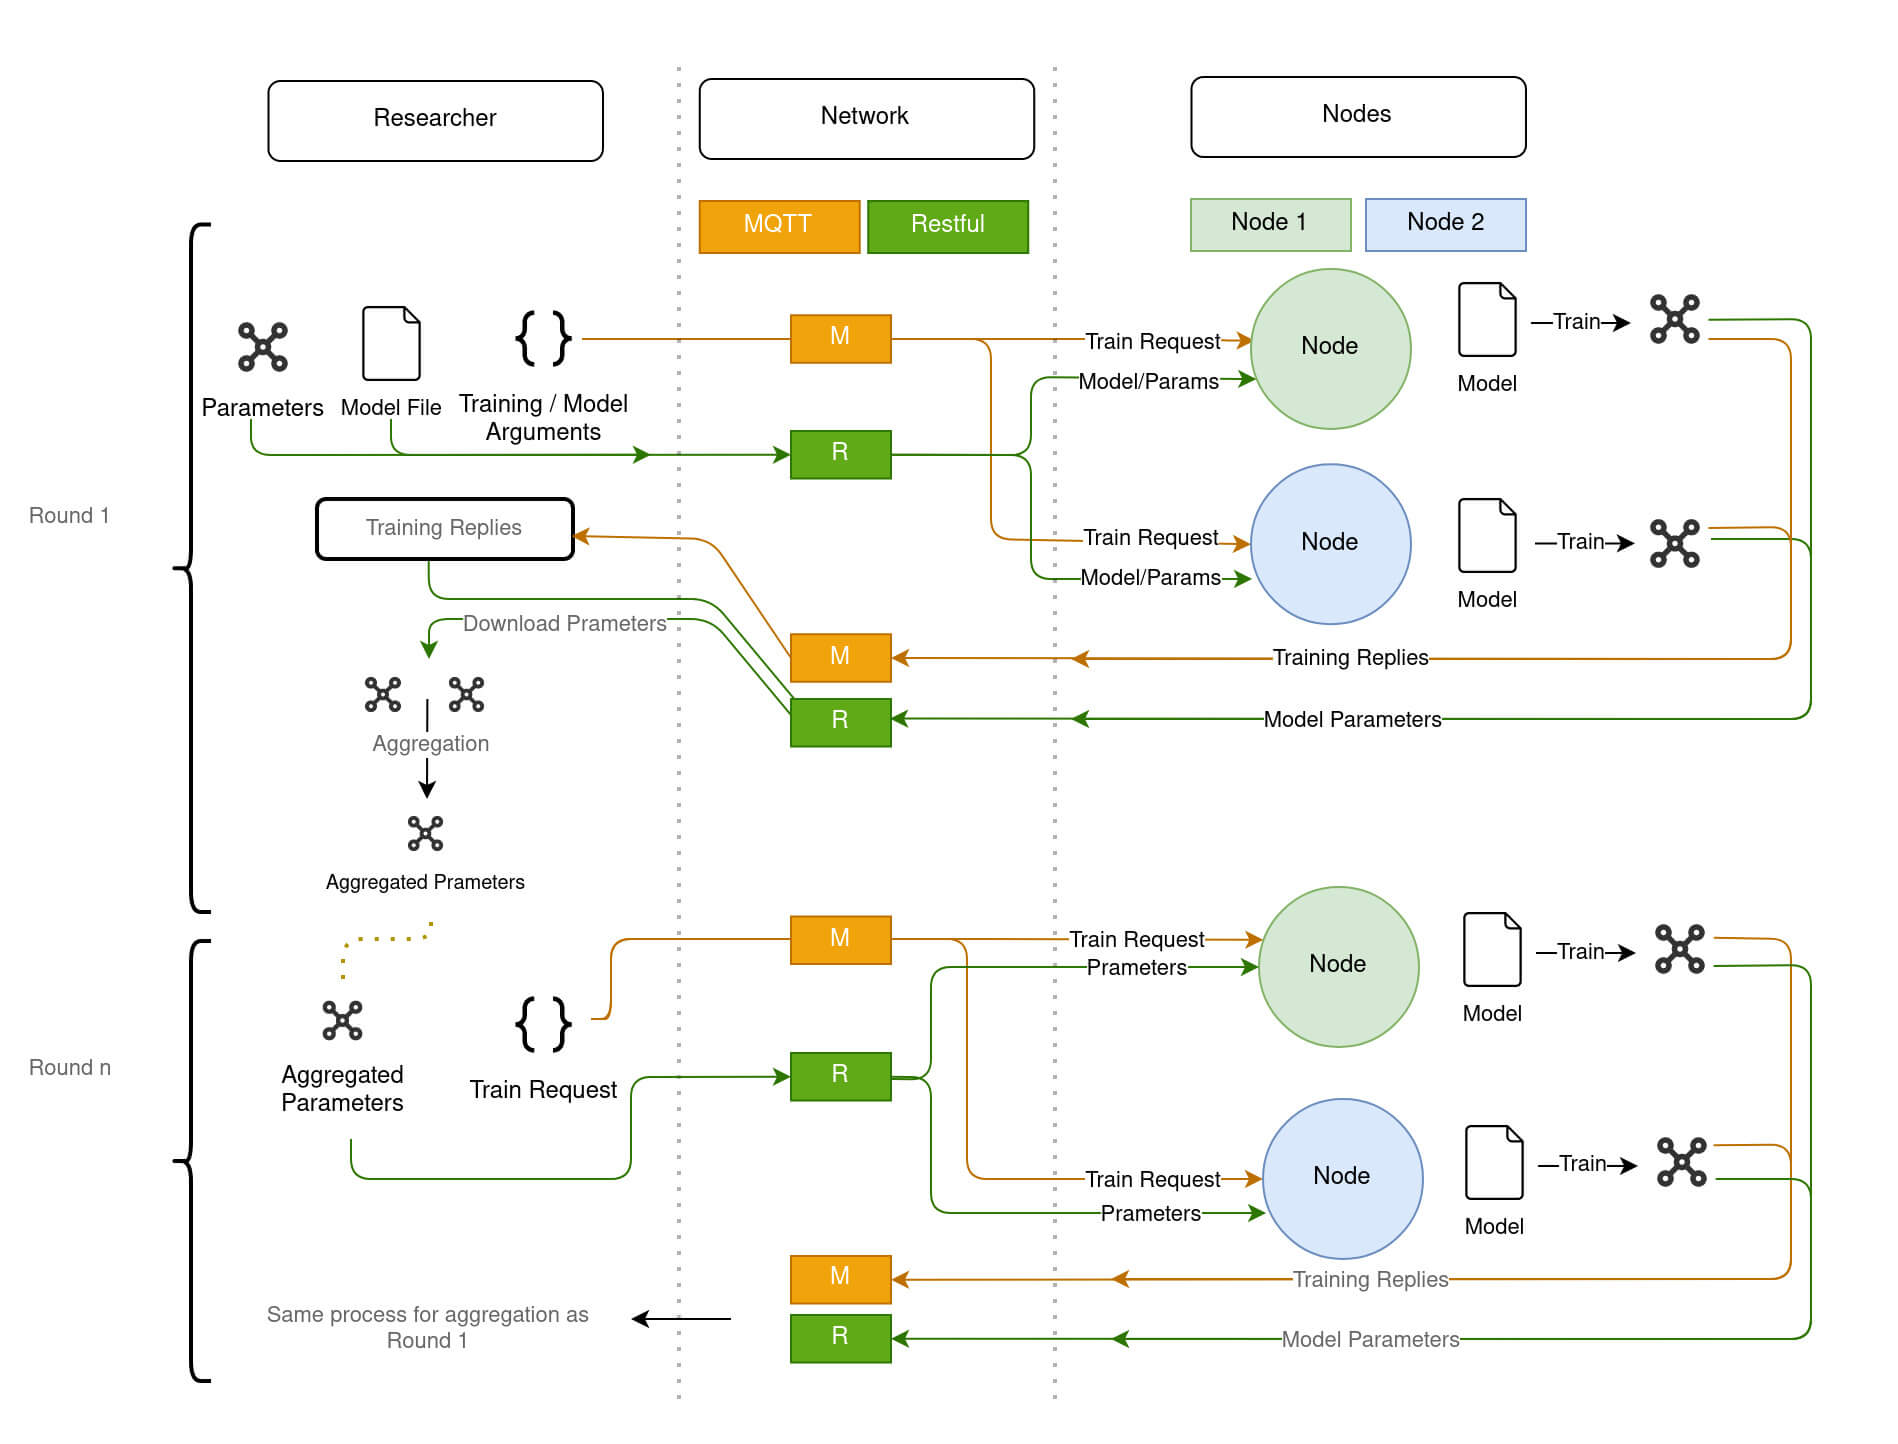
Researcher and 2 Nodes during a Federated Training The Methods run()and run_once()
In order to provide more control over the training rounds, Experiment class has two methods as run and run_once to run training rounds.
run()runs the experiment rounds from current round to round limit. If the round limit is reached it will indicate that the round limit has been reached. However, the methodruntakes 2 arguments asroundsandincrease.roundsis an integer that indicates number of rounds that are going to be run. If the experiment is at round0, the round limit is4, and if you passroundsas 3, it will run the experiment only for3rounds.increaseis a boolean that indicates whether round limit should be increased if the givenroundspass over the round limit. For example, if the current round is3, the round limit is4, and theroundsargument is2, the experiment will increase round limit to5
run_once()runs the experiment for single round of training. If the round limit is reached it will indicate that the round limit has been reached. This command is the same asrun(rounds=1, increase=False). However, ifrun_onceis executed asrun_once(increase=True), then, when the round limit is reached, it increases the round limit for one extra round.
To run your experiment until the round limit;
exp.run()
To run your experiment for given number of rounds (while not passing the round limit):
exp.run(rounds=2)
To run your experiment for given number of rounds and increase the round limit accordingly if needed:
exp.run(rounds=2, increase=True)
To run your experiment only once (while not passing the round limit):
exp.run_once()
To run your experiment only once even round limit is reached (and increase the round limit accordingly if needed):
exp.run_once(increase=True)
Running experiment with both run(rounds=rounds, increase=True) and run_once(increase=True) will automatically increase/update round limit if it is exceeded.