

Fed-BioMed Workflow
We present in the following page a short step-by-step illustration detailing the workflow of Fed-BioMed.
The steps are:
- Setting up the
NetworkandNodes - Deploying dataset on
Nodes - Write a Federated Model
- Run and monitor a Federated Model
- Model retrieval and evaluation
For installation, please visit the software installation page.
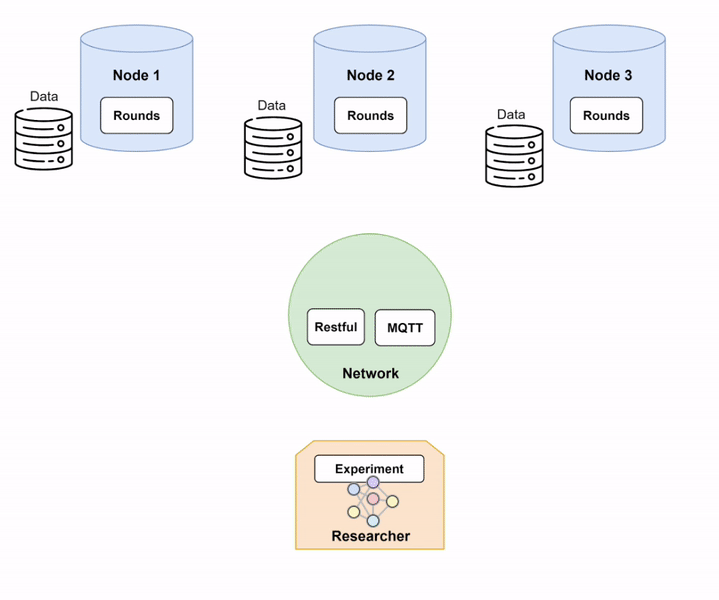
Step 1: Setting up Network and Nodes.
In order to run Fed-BioMed, you need to start first the Network component and then one or several Nodes. When setting up the Nodes, each of them will connect to the Network, as shown in the diagram below (Diagram 1).
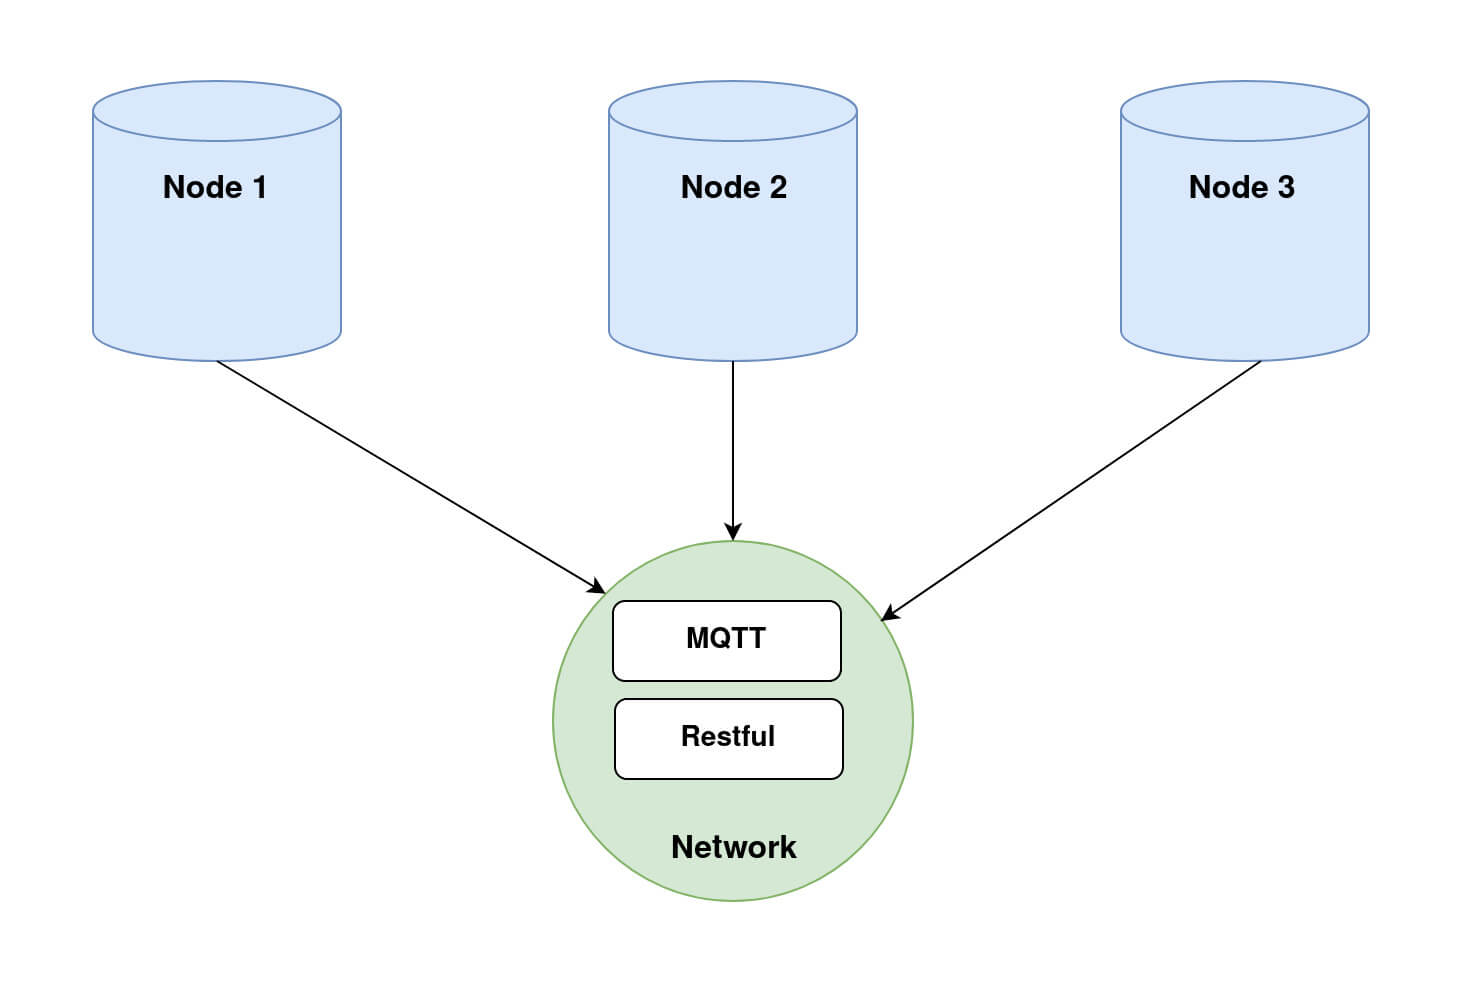
Nodes and Network in Fed-BioMed, and their interactions with the other components. Step 2: Deploying a dataset on the Nodes.
Step 2.1: Loading a dataset into a Node.
Fed-BioMed supports standard data sources, such .csv files and image folders, and provides specific tools for loading medical data formats, such as medical imaging, signals and genomics information (Diagram 2).
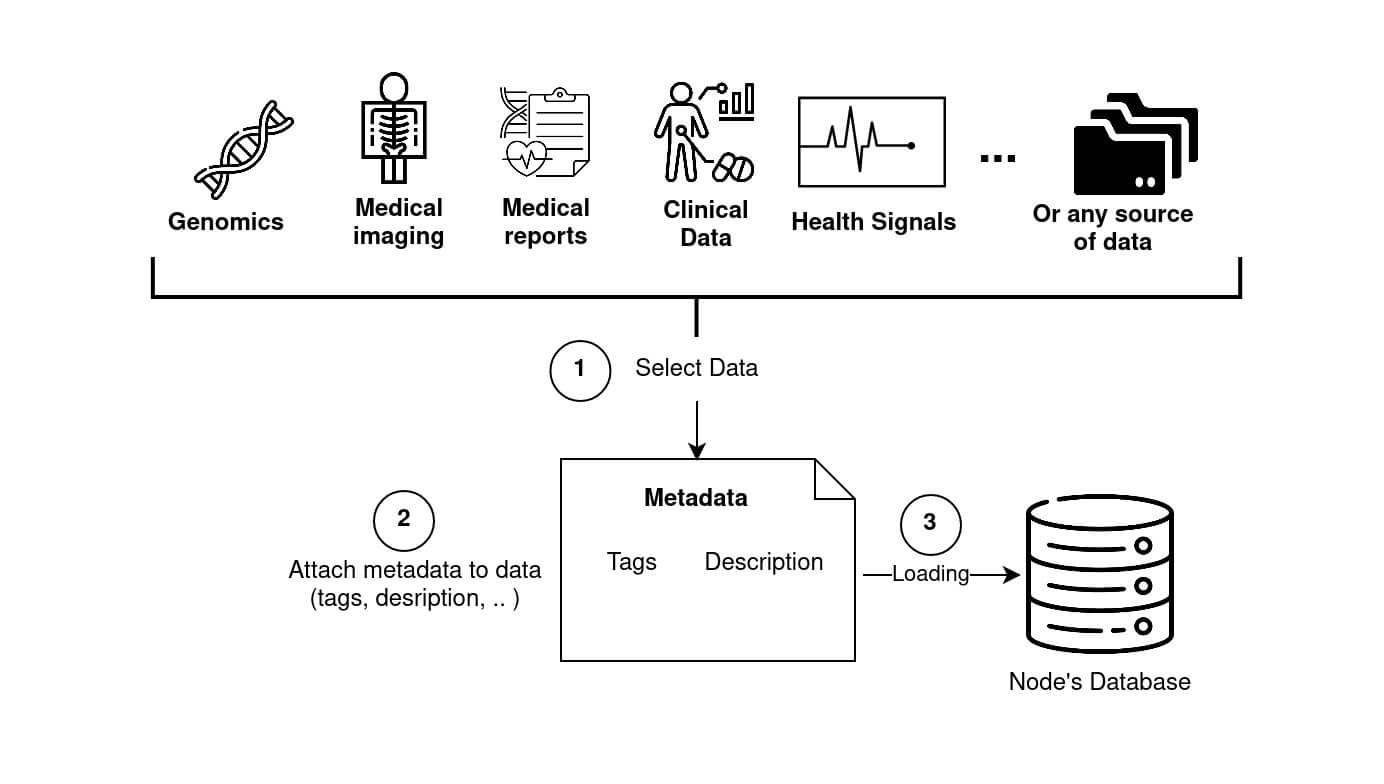
Node. Different data types are available, especially for medical datasets. Folder and Genes icons courtesy of Freepik, Clinical icon courtesy of Parzival' 1997, Flaticon.
Once provided with a dataset, a Node is able to train the models sent by the Researcher.
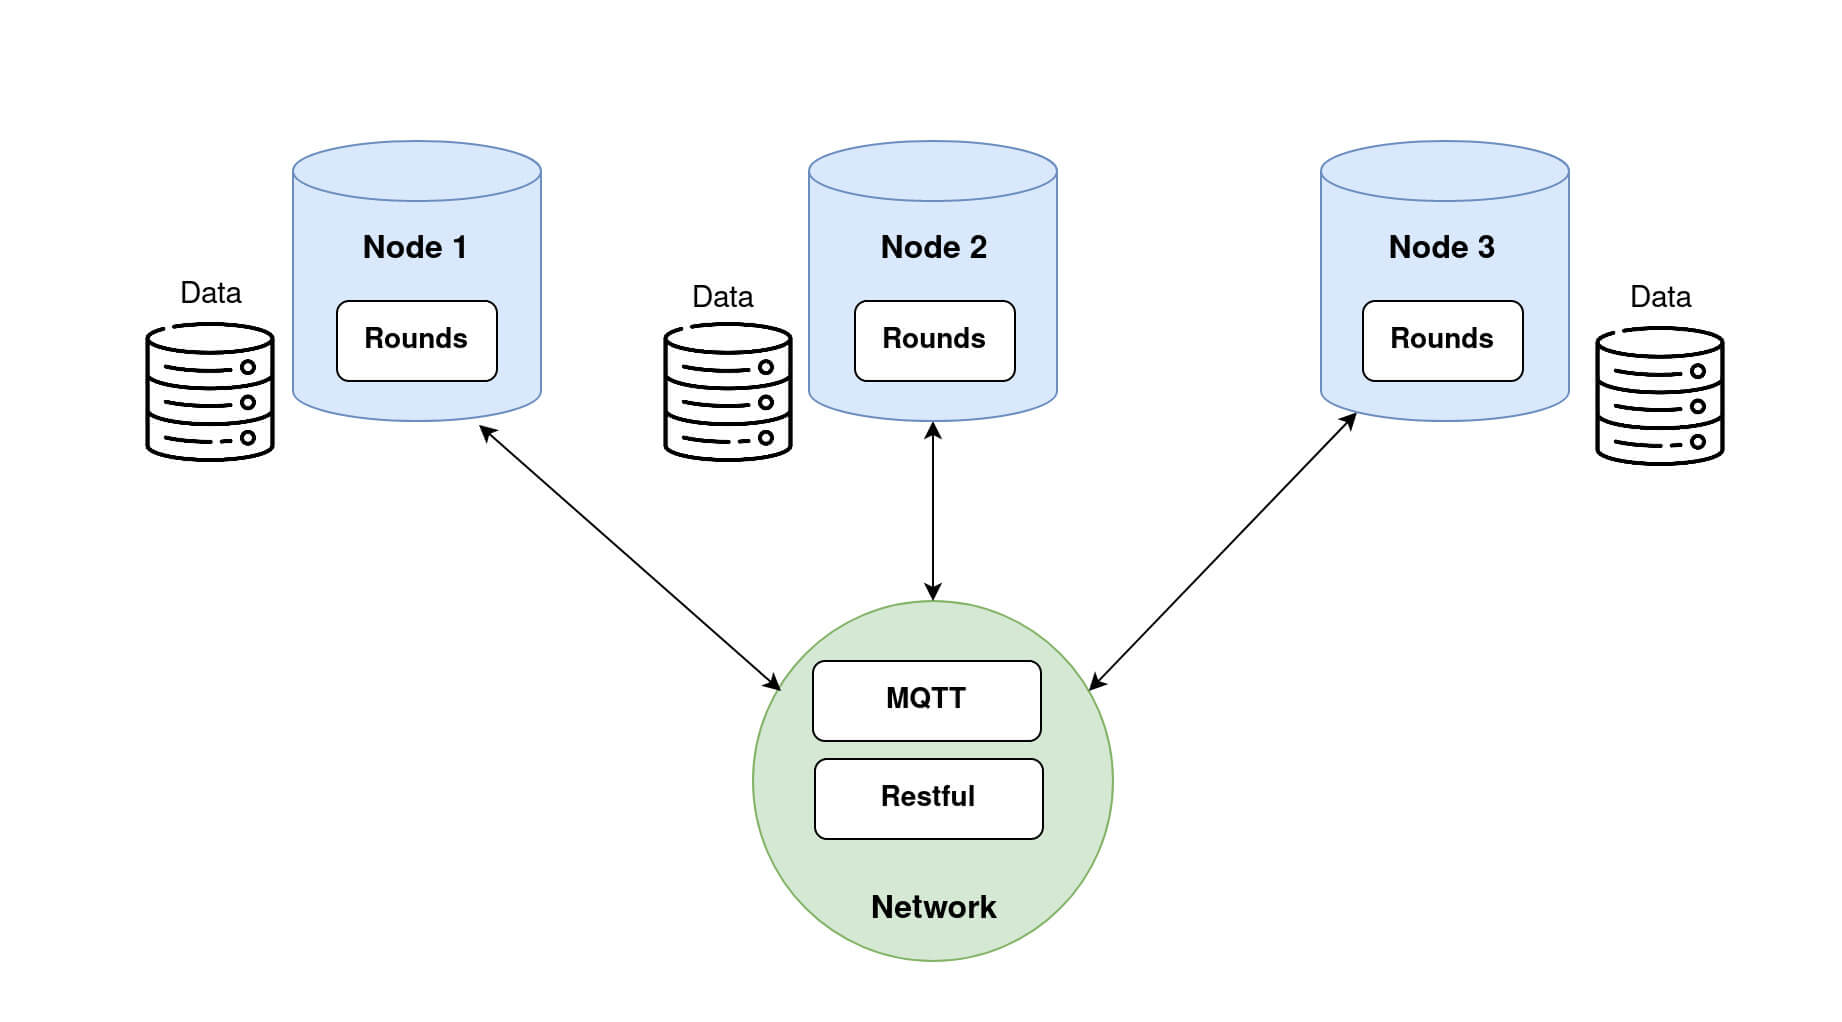
Nodes with respective datasets loaded. Step 2.2: Retrieving Nodes dataset information on the Researcher side.
It is possible for the Researcher to obtain information about the dataset of each Node, as shown in the diagram 4 below.
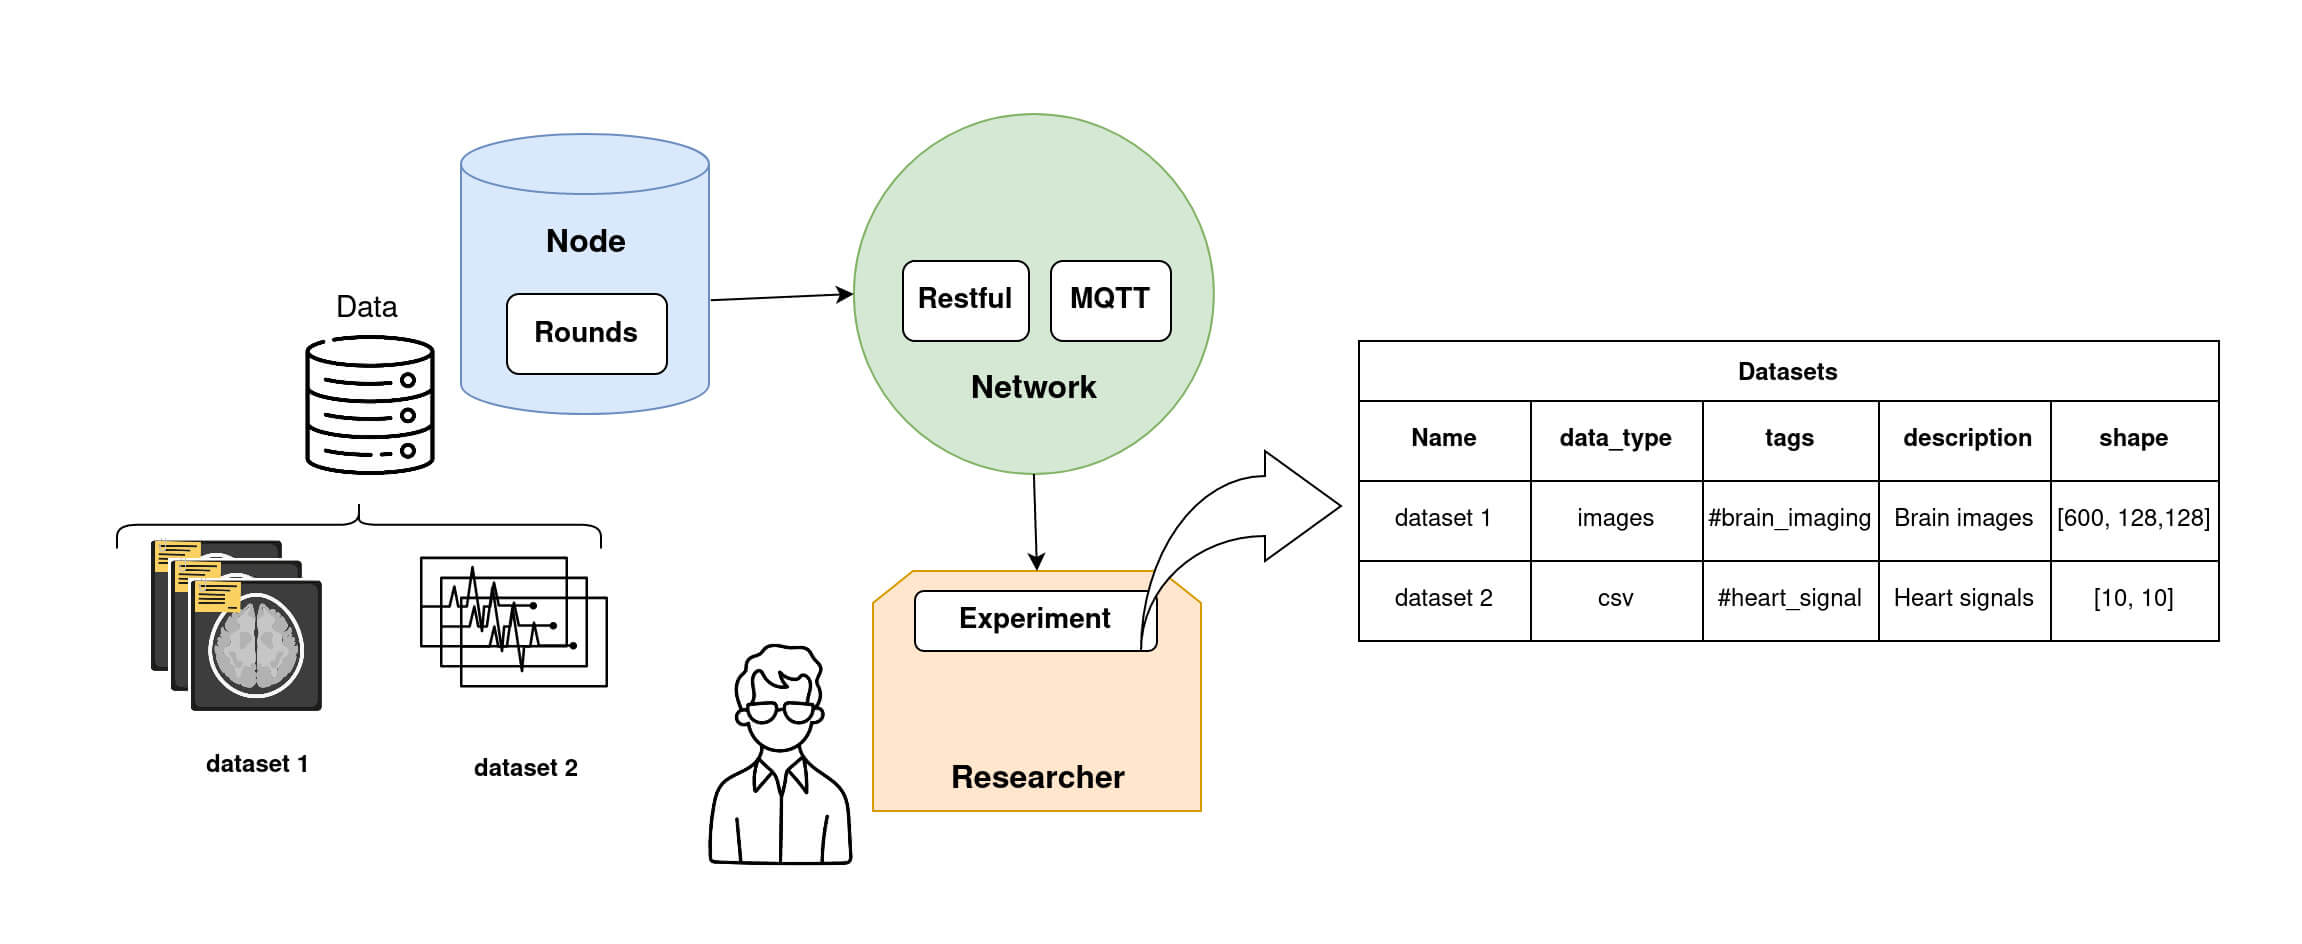
Node datasets information that a Researcher can retrieve. The researcher can access datasets' metadata such as datasets name, dataset data_type, dataset tags, description and shape stored on each node. Step 3: Write a federated Model (TrainingPlan, Aggregator and Strategy)
To create a Federated Model Experiment in Fed-BioMed, three principal ingredients must be provided:
- a
Training Plan, which is basically a Python class, containing the model definition and related objects, such as cost function and optimizer, and eventually methods for pre-processing (e.g., data standardization and/or imputation), and post-processing (run after that the training of the model on theNodeis completed). - an
Aggregatorthat defines how the model parameters obtained on each node after training are aggregated once received by theResearcher. Examples ofAggregatorcan beFedProxorSCAFFOLD. - a
Strategythat handles both node sampling and node management (e.g., how to deal with non responding nodes).
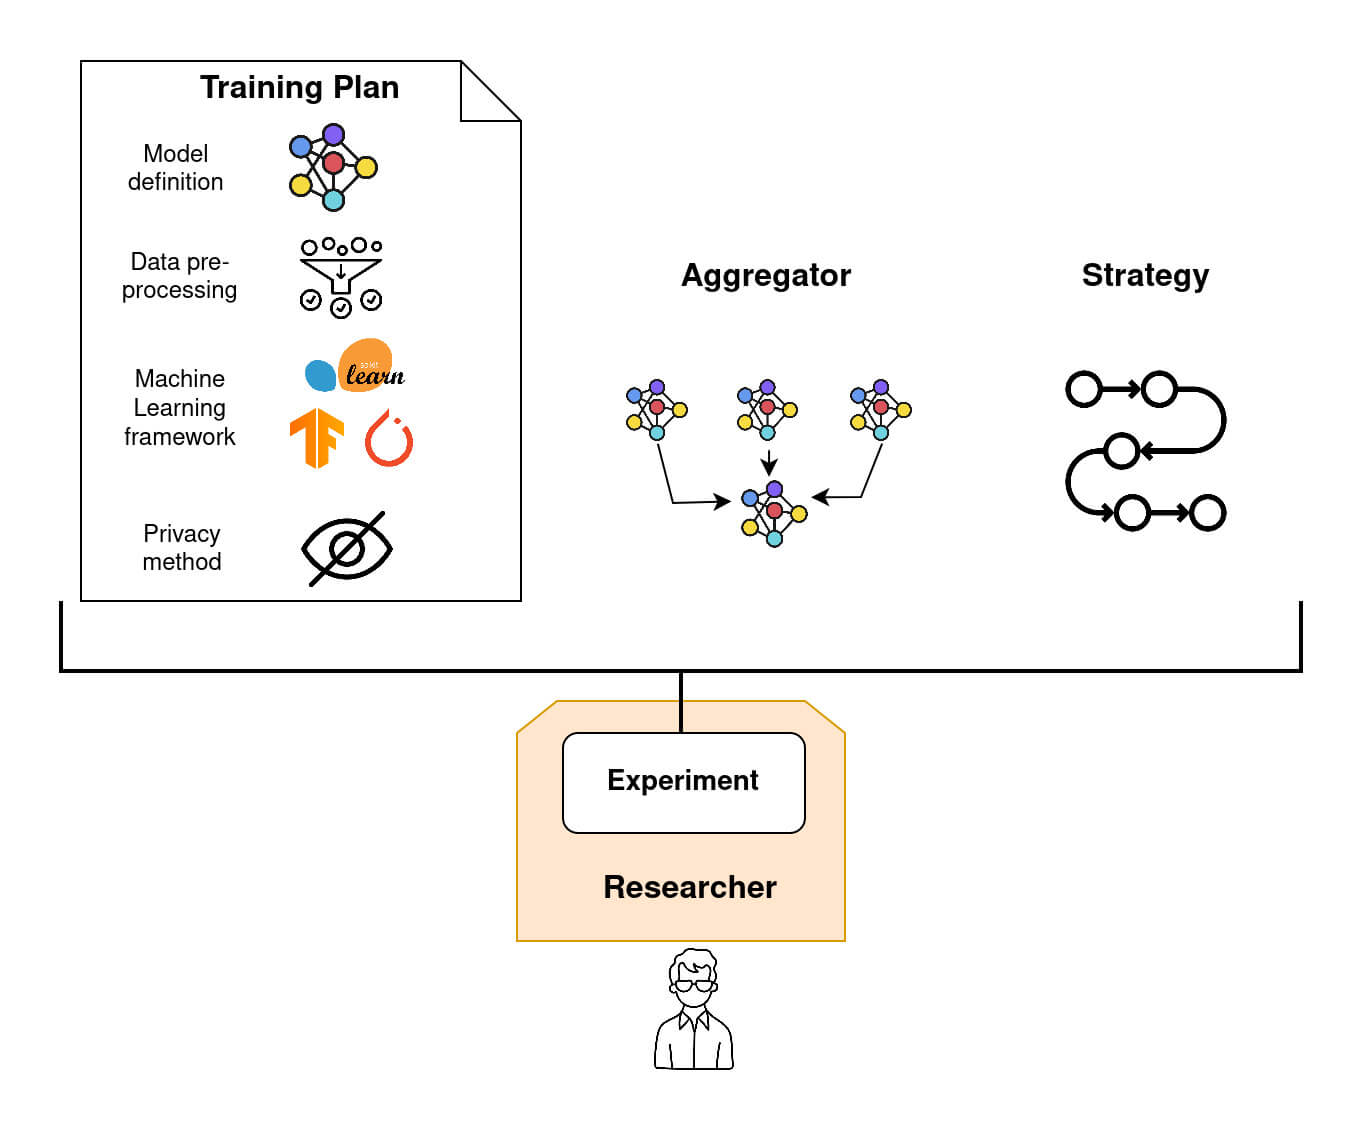
Icons by phatplus - Flaticon
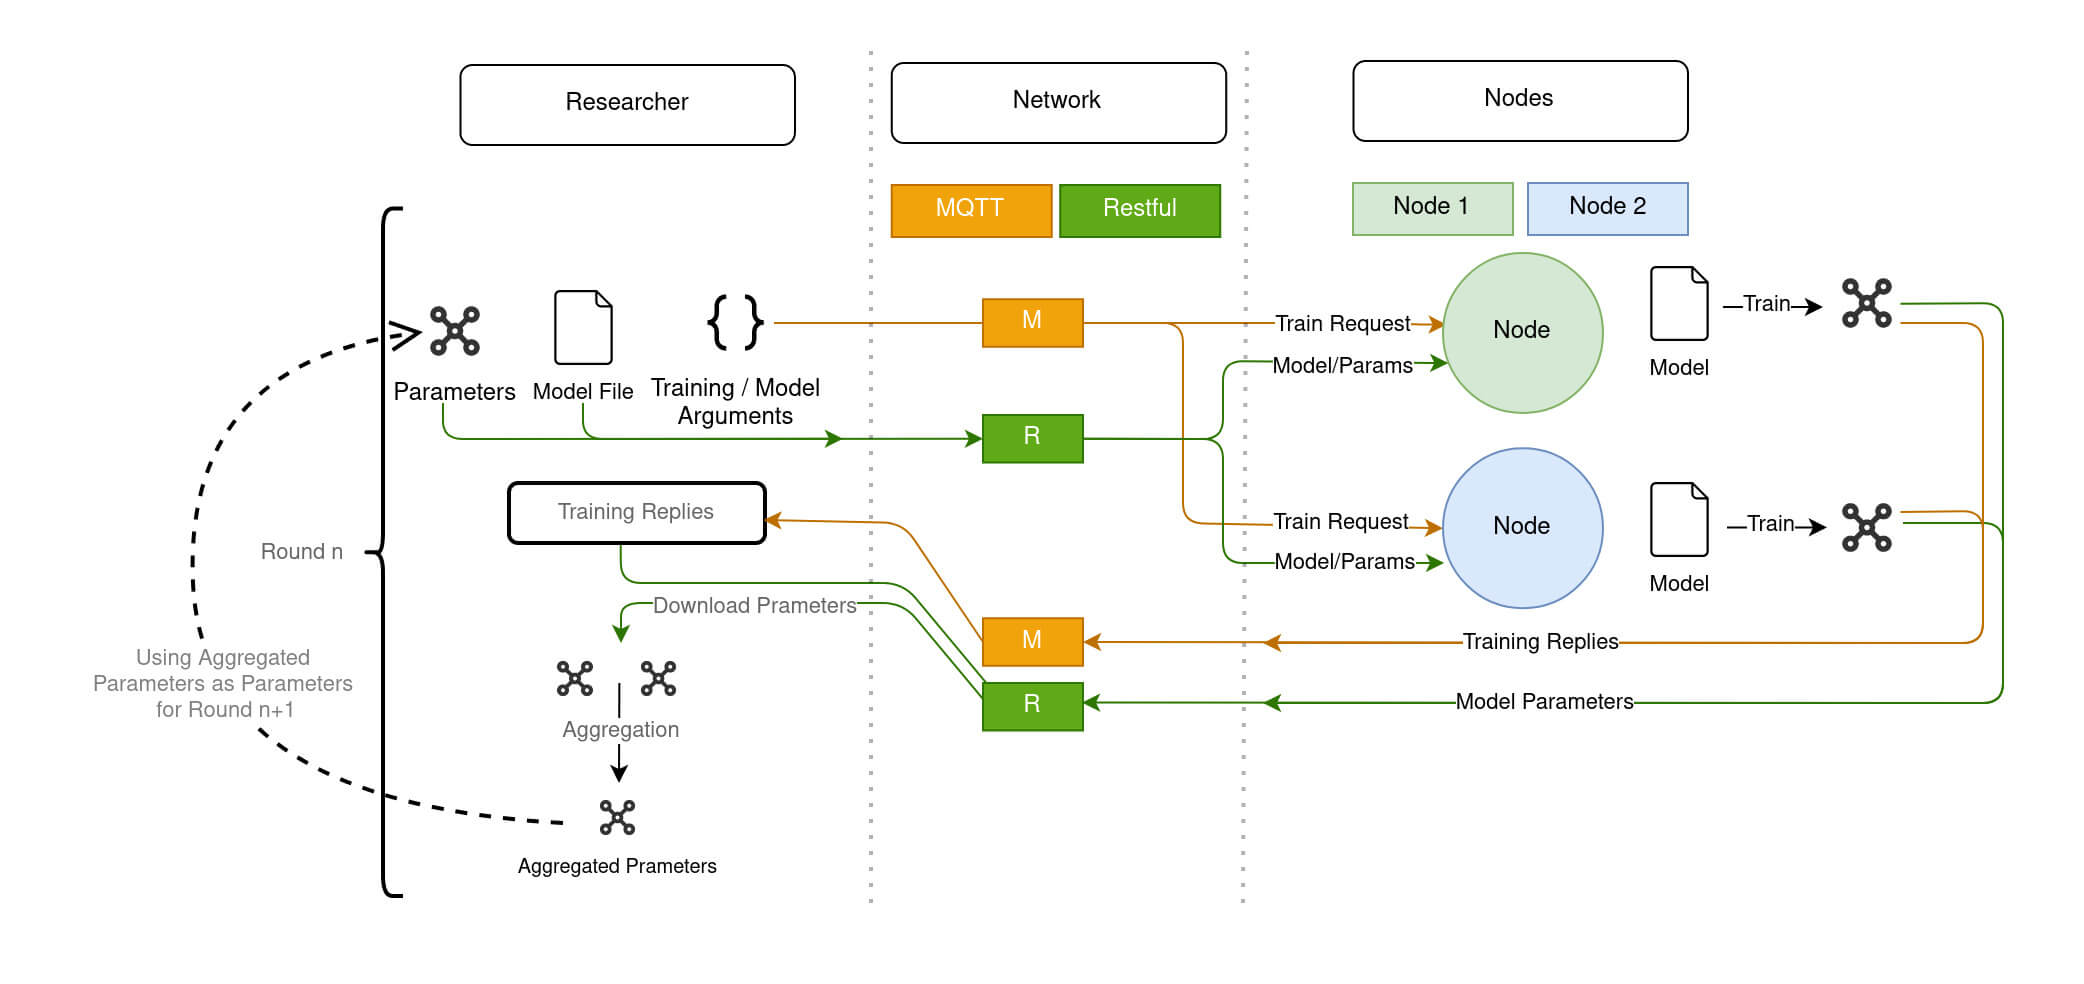
Step 4: how to run and monitor an Experiment
Running an Experiment
The animation of Diagram 6 shows how a federated model is trained within Fed-BioMed:
- The global model is sent to the
Nodesthrough theNetwork. The model's architecture is defined in aTrainingPlan, and weights are contained in a specific file exchanged over theNetwork; - Each
Nodetrains the model on the available local data; - The resulting optimized local models are sent back to the
Researcherthrough theNetwork; - The shared local models are aggregated to form a new aggregated global model, according to the
Aggregator.
Nodes and trained on their local data, to be subsequently aggregated. Grayed-out models represent an untrained model, while colored ones represent a model trained on local data. Diagram 7 provides a more technical description of the training process within Fed-BioMed:
- The
Researcherinitiates training round by issuing to theNodesa TrainRequest through MQTT component of theNetwork, and by sending the model and the current global parameters through the Restful server component of theNetwork. - Upon a TrainRequest, each
Nodetrains the model and issues a TrainingReply to the Researcher passing through the MQTT of theNetwork, as well as the updated parameters (through the Restful server) - Once updated, the model parameters coming from each Node are collected by the
Researcher, and aggregated to create the new global model.
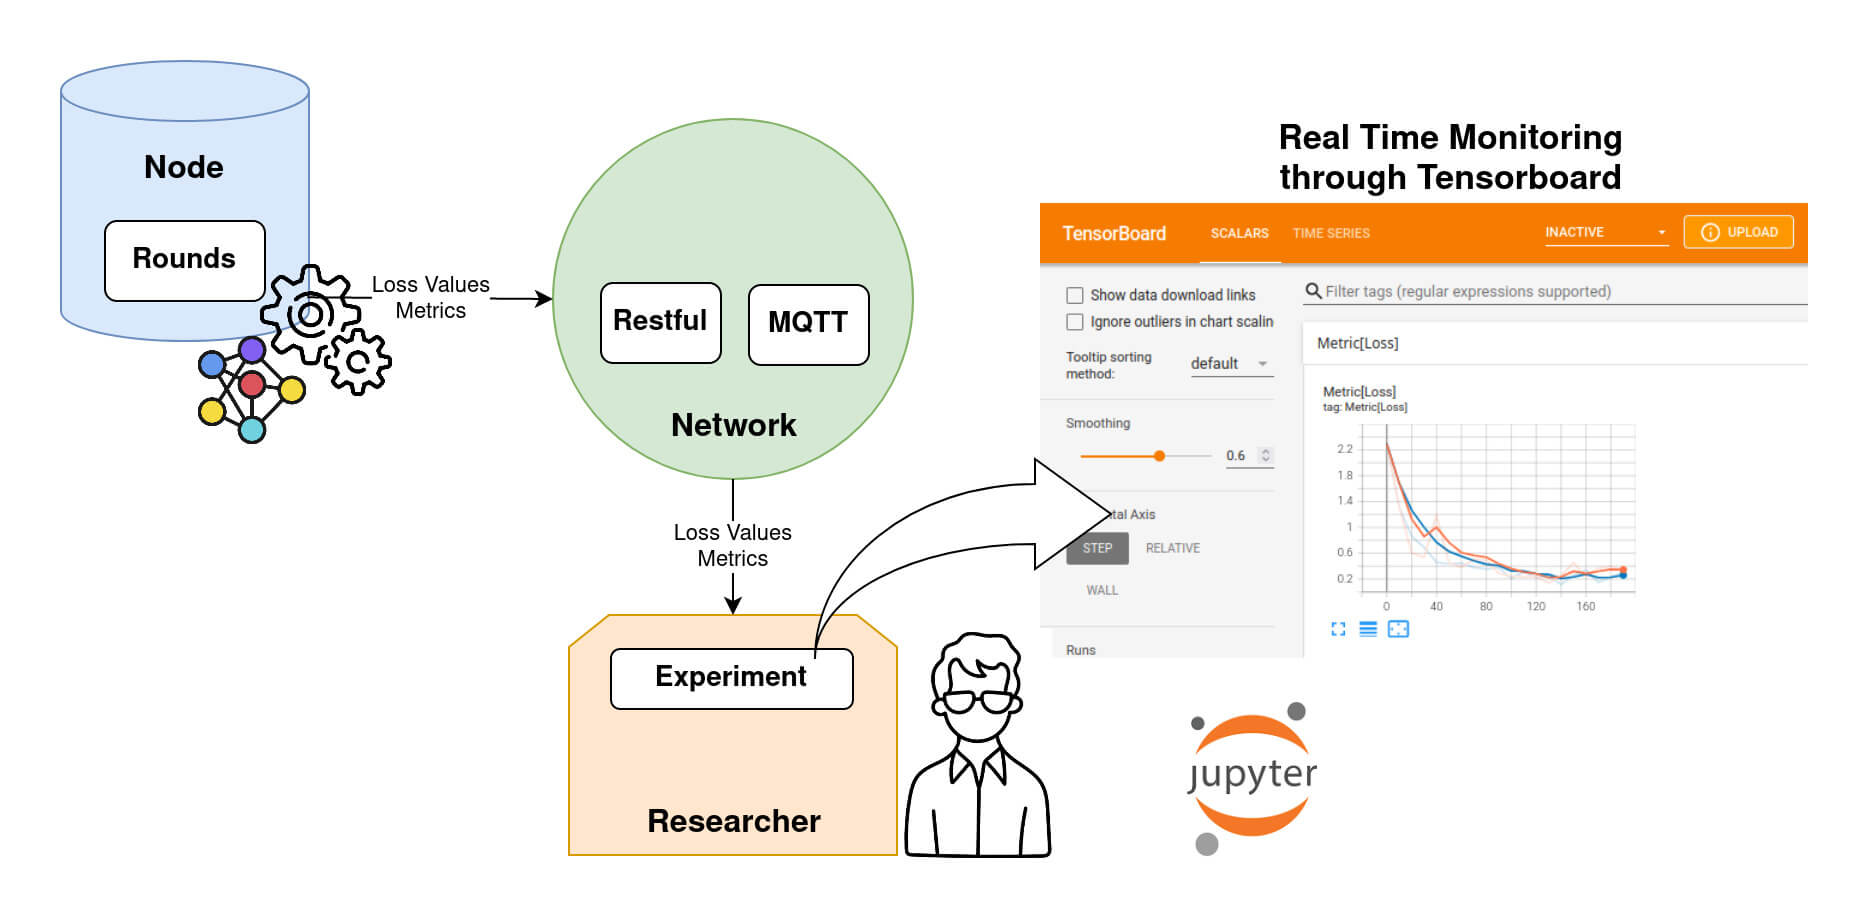
Monitoring an Experiment.
The loss evolution is sent back to the Researcher at each evaluation step during training. The Researcher can keep track of the loss using Tensorboard, as shown in DIagram 8.
Step 5: retrieving the model and performing model evaluation
Once federated training is complete, the Researcher can retrieve the final global model, as well as other relevant information such as the timing between each connection, loss and the testing metrics value (if a validation dataset is provided). Fed-BioMed provides a number of standard metrics, such as accuracy for classification, or mean squarred error for regression, and allows the definition of custom ones.
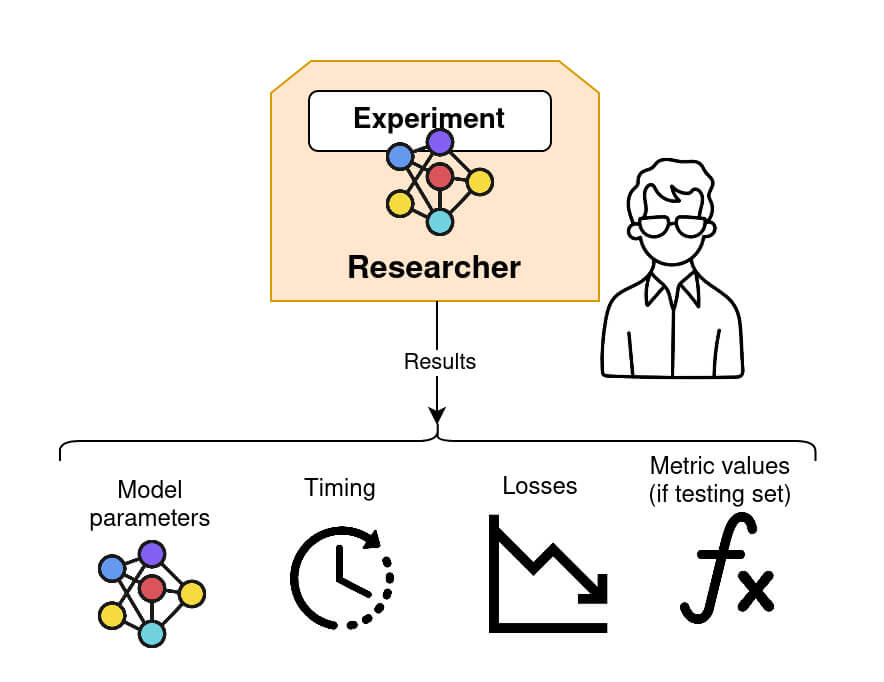
Icons courtesy of Ramy W. - Flaticon
Going Further
Detailed steps on how to install Fed-BioMed on your computer.
More tutorials, examples and how-to.
Provides an exhaustive overview of Fed-BioMed Nodes.
Researcher configuration Guide
Provides additional info on Fed-BioMed Researcher.